Best Camera Settings for Long-Term Time-lapse
- ck chan
- Mar 28, 2023
- 5 min read
Updated: Apr 13, 2023
Long-term time-lapse with a DSLR camera requires you to leave your camera out on a job site, unattended for many days at a time. So getting the proper camera settings is the first step to creating a successful time-lapse video.
Pre-Shoot Camera Preparation
The first tip is to get all the camera settings done right, before leaving for the job site. This will reduce your workload on site and lessen the chances of making mistakes with your camera settings.
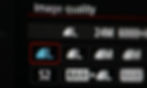
Shooting Format
The default format setting for most photographers is the RAW format. However, for 99% of long-term timelapse job requirements, shooting in RAW is overkill. The data storage space to store all the RAW data will be massive. Post-processing the RAW data will also be awfully painful. Unless your client has specific requirements for RAW, we will typically shoot in fine jpeg at around 16 to 24 megapixels resolution. Each image file size is around 4MP, which is a manageable size. The end result will be a 6K video after post-production. We like to work with 6K in post-production because it allows us to add movement to our timelapse videos.
Setting the interval
To understand recording intervals, let’s recap the basics of timelapse. 25 photographs, when rendered in sequence, will make 1 second of a timelapse video. Shooting closer intervals will give you a smoother transition from frame to frame. It also lets you delete unwanted images like raindrops, sun flares, night shots, etc. More photos will add more work in post-production, but that’s much better than not having enough photos to create your content. From our experience, shooting at longer intervals beyond 15 minutes per shot will create a choppy timelapse with a strobing, flickering effect. This is largely caused by the changes in lighting conditions, due to cloud cover and the sun’s movement throughout the day.
Here are some considerations when deciding on the timelapse interval.
1. How long is the project?
2. What is the required duration of the completed timelapse video?
3. Do your clients need a monthly progress video?
4. Are you using a cellular data plan? Shooting at shorter intervals may blow your budget. So make sure you have done your calculations first.
5. Are there high and low activity periods in the project?
6. What power options are available? Solar or AC? If you are using solar, you will be more concerned about power usage. Shorter intervals will mean more uploads and higher power consumption. The actual power usage depends on a range of factors (amount of sun) and your battery size. So run some on-site tests to work out how fast you can push the system.
Finally, from our years of experience filming timelapse as a business, we recommend a shooting interval of 10 to 15 minutes per shot. This applies to 95% of long-term timelapse. We do adjust the interval closer sometimes when there are important milestones in the project to capture. Most projects will have a few of these events before the project is completed. In those instances, we will likely have a ground camera team, along with drone support and secondary cameras filming short-term time-lapses of the event.
Aperture Setting & Priority
90% of our timelapse projects will use wide-angle lenses to get the most coverage on-site. The depth of field for these lenses is relatively deep already. So we are not concerned about shallow depth of field from a lower F-Stop. As a guiding principle for lens sharpness, we will set the aperture around F5.6 to F8. If the camera is set to F11 and beyond, capturing the activities in low-light conditions will be challenging.
You may also run the risk of bringing your depth of field too close to the camera and picking up the dust spots that may appear on the window of the timelapse housing.
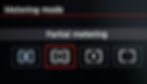
Exposure Metering
The decision on what exposure metering to use will depend on the composition. Generally, we do not use spot metering due to the constant activities on site. A spot meter reading on one frame may provide a different reading from the next frame taken 10 minutes later. So an exposure reading of a larger area will reduce the chance of a wrong exposure reading that you can get from spot metering. For this reason, we prefer center-weight or evaluative metering.
Manual Focus
This is a must for long-term timelapse. There is simply no reason for the camera to be set on auto-focus because the focal distance never changes for a long time-lapse project.

Use a Manual Focus Ring
You should use a lens with a manual focus ring. It can be identified by the hard stop on both ends when you turn it. A manual focus ring can be secured with adhesive tape in a fixed focal position, so it never moves. In contrast, an electronic switch focus ring (it has no hard stop when you spin it), can change focus unexpectedly over time.

Maximum ISO
This is something to consider if there are night activities that need to be captured.
1. How much light is available at night to illuminate the site?
2. What is the acceptable image noise level to you?
3. What are the low light capabilities of the camera you are using?
The camera we typically use for our timelapse is an entry-level Canon DSLR. The sites are illuminated when there are work activities at night. So we set the maximum ISO to 1600 if the night activities are important to capture. Otherwise, a maximum ISO of 400 is good for sites with only daytime activities.
White Balance
We set our white balance on manual, at a daylight color temperature of 5500 kelvin. The goal here is to ensure that the camera is not automatically processing one image differently from the next.
Power Saving Functions
An important aspect of long-term time-lapse is finding ways to reduce power consumption to a minimum, especially if you are running on solar power. So turn off non-essential settings like GPS, Wi-Fi, and image live-view
Image processing settings
We set all image processing functions to manual to maintain consistency across all the images. This includes low-light noise reduction, in-camera HDR, and Active D-lighting
Card Size & Speed
Once you have determined your image file size and shooting interval, you can work out the card size for the project. Get a card size with sufficient space that can last you for 2 months, just in case your regular visit to the job site is delayed. We typically use a 128 GB SD card for our long-term timelapse. Since the shooting intervals are minutes apart, investing in expensive cards with lighting fast writing speed is unnecessary.

To make it simple, here is the cheat sheet for you. We hope that these camera setting tips are helpful to you. Tbox time-lapse specialises in long-term time-lapse equipment that works with Canon DSLR & mirrorless cameras. Do contact us at info@tbox-timelapse.com if you need assistance.
Learn More